Monex Index

Kamis, 29 September 2011

LOWONGAN KERJA


“ Walk in Interview”
Sebuah Perusahaan di bidang Jasa Operator Telekomunikasi Terkemuka membutuhkan segera :
1.     Small Medium Enterprise Representative (SMER)
2.     Account Officer (AO)
Kualifikasi :
  • Pria, usia max 30 tahun (1),
  • Menarik, komunikatif dan fast learning, hard working
  • Pendidikan minimal DIII/S1 (1) segala jurusan. & pny  SIM C (1&2)
  • Bersedia ditempatkan di Wilayah Yogyakarta

Bagi yang memenuhi syarat,
 segera datang langsung dan interview tahap I   :
Jl. Veteran No 184 B Yogyakarta
dengan membawa lamaran lengkap yang ditujukan
kepada Pimpinan Cabang :

Tanggal
Waktu
Area Penempatan
3-5 Oktober 2011
10:00 – 15.00
Yogyakarta


Up. Mba Susi
Fr Mila kisel
Terbit sabtu 1 Oktober 2011

Selasa, 23 Agustus 2011

Promo Bigif Telkomvision

Jelang Idul Fitri 1432H,Telkomvision adakan Promo. Free Abonemen Agust - Sept ' 11.Info : 0274-6624410.

Rabu, 08 September 2010

Flock 2.5.6 Now Available - Fixes Flickr and Twitter Issues

Hey Flockstars,


I am very happy to inform you that Flock 2.5.6 is now available from our homepage. 2.5.6 addresses the Flickr logout issues and Twitter sidebar issues that some people have been experiencing. 2.5.6 also includes a Firefox security update and various other fixes, all of which you can read about in the release notes.


Please note that 2.5.6 auto-updates are not turned on at this time. The best way to upgrade is to follow these steps:


  1. Download 2.5.6 from www.flock.com

  2. Shut down Flock completely

  3. Back up your profile (this isn't entirely necessary...just a good policy in general)

  4. Run the Flock 2.5.6 installer

  5. Open Flock


Congrats, you've been updated to the last version of Flock!


Some of you may be wondering about the status of the Facebook Chat/Notifications feature in the bottom right of the browser. We would have loved to fix the issues with this feature in 2.5.6. However, Facebook continues to rapidly change the code powering these features, and does not provide an API for connecting to them (like they do with other features). We’re hoping to reach a resolution for this popular feature that will be less sensitive to Facebook code changes going forward.


Thanks for your terrific support and patience, and please continue to provide your feedback via GetSatisfaction, Twitter, Facebook and beyond - it is invaluable towards making this product better.


Flock'n'roll,


Evan Hamilton

Community Ambassador


evan at flock dot com

Blogged with the Flock Browser


Tags:


View Original Article

Blogged with the Flock Browser

NASA brings historic photos to Flickr Commons

NASA and the Internet Archive have agreed to bring historic photos related to the space organization to Flickr Commons.

View Original Article

Blogged with the Flock Browser

What's hot (and not) about Windows Phone 7

After making Windows Phone 7 her primary mobile operating system for the last month, CNET's Ina Fried reports about what she does and doesn't like about Microsoft's new offering.

View Original Article

Blogged with the Flock Browser

Selasa, 31 Agustus 2010

Browser Choice Means We All Win

For those of us who believe in the importance of freedom of choice, this week is very special. In the past, European PC users were only given Microsoft’s choice of browsers — Internet Explorer. But now, thanks to the European Commission, users can choose their browser from twelve of the top browsers available in Europe. As part of Microsoft’s anti-trust settlement with the Commission, these twelve browsers will be presented to users of the Microsoft Windows operating system. This presentation, referred to as the Browser Choice Screen, was launched this week and will be delivered to 192 Million PCs within 27 European countries over the next 90 days. Flock is thrilled to have been selected as one of the top twelve browsers.


The fact that millions of users can now choose a browser that fits their needs is the good news. Unfortunately, there’s some bad news too. A representative mock-up of the actual window that is now being delivered to PC users in Europe by Microsoft is available for you to see at http://www.browserchoice.eu. Unfortunately, this Choice Screen design leaves most users unaware that there are more than five of the largest browsers to choose from. So it doesn’t achieve the European Commission’s stated objective to provide "information on the 12 most widely-used web browsers and to allow users to easily download and install one or more of these web browsers".


Flock has joined forces with five other browser companies to present an urgent petition to the European Commission so that a simple fix can make all the browser choices readily apparent. Last night, we formally submitted our Petition to the European Commission.


As you can see in the petition, what we’re fighting for on behalf of users is very straightforward. We want them to know about the wide range of choices they have when they select a browser. Whether they need a social browser, such as Flock or any of the other eleven options. We can all agree that everyone deserves the opportunity to make the most informed choice possible.


The European Commission quickly acknowledged our submission, and we are hopeful that we can engage in a dialogue about a simple, quick fix that would help consumers make an informed choice.


Browser choice is important because it encourages innovation. And fixing the current Choice Screen design means Internet users in Europe will have an effective and unbiased ability to select the browser that best meets their needs based on the merits of all 12 browsers, and not only the "Big 5" on the main screen.

View Original Article

Blogged with the Flock Browser

Senin, 02 Agustus 2010

Download My Free Report – Has The Internet Marketing Bubble Finally Burst?

Hey everyone,


I’ve written an eye opening report entitled “Has the Internet Marketing Bubble

Finally Burst?”


It’s got some pretty cool stuff inside it.


And guess what..


It’s not part of any fancy product launch – I’ve  just written it to

give back to our cool community and try and help everyone out :-)


Inside it you will discover…


- What is the Product launch slope of death and why it can KILL

your business


-  How I generated 500%  more commissions NOT promoting on

launch day.


- The FATAL mistakes that will make a JV partner never do business

with you again.


Right click here and select “Save Target As” to download the report now


If you think its cool or want to leave your feedback below that would

be GREAT!


Look forward to hearing your feedback,


Foxy

View Original Article

Blogged with the Flock Browser

Minggu, 11 Juli 2010

Keep current on all things advertising

The rapid pace of change in the advertising space can be dizzying. From new ad formats to new ad systems, from startups to mergers, the marketing industry is running at a million miles an hour, and it’s often daunting to keep up with it all. We know that staying informed takes a lot of effort, and it’s critical to make good decisions about how you spend your time and resources.

That’s why we put together Google Ad News. Powered by Google News, Ad News is a simple but powerful way for anyone in the advertising industry to track current news coverage on relevant subjects such as display, search, mobile and even traditional media - all in one place. Subscribe to news feeds in the categories you care about most, or search to find coverage on topics related to your business, such as your niche industry or brand.

We invite you to check it out and share it with your colleagues. Hopefully, you’ll find lots of relevant news that’ll help you spend less time scouring the web and more time building your business.

Jumat, 09 Juli 2010

Cara Mengatasi Galat  bX-rg6px pada Template Blog

Ada pertanyaan yang masuk ke email mengenai galat. Kita sebut saja Mr.X, karena beliau tidak ingin disebutkan nama dan blog nya karena alasan privacy.
Galat yang menimpa template Mr.X adalah galat dengan kode galat bX-rg6px.
Bila anda terkena galat ini anda tidak bisa menambah gadget ataupun mengedit widget pada template anda. Karena galat ini akan memblokir menu Rancangan atau Design pada template blog anda.
mmmmm...serem juga ya... :D
Tapi jangan kwatir, karena M.A punya tips cara mengatasi galat ini.

Setelah M.A searching ke google, ternyata bukan jawaban dari masalah yang M.A dapatkan melainkan banyak nya blogger yang mengalami masalah serupa terkena galat bX-rg6px dan belum ada pemecahan masalah nya.
Galat terkadang muncul pada blog kita karena ada nya kesalahan dari kita pribadi maupun kesalahan system di blogger yang mendeteksi kode/script yang kita pasang pada template di deteksi sebagai galat walaupun sebenar nya kita sudah merasa benar dan tidak melakukan kesalahan.

Galat terkadang muncul dan terkadang bisa hilang dengan sendiri nya dan ada juga beberapa galat yang bisa di pulihkan dengan menghapus cookies. Pada browser Mozilla Firefox seperti galat bX-4h0tgg ini bisa dihilangkan dengan menghapus cookies. Tapi tidak dengan galat bX-rg6px.

Lalu bagaimana cara memulihkan template yang terkena galat bX-rg6px???
Setelah mendapatkan izin untuk mengakses langsung template blog Mr.X, akhir nya M.A masuk ketemplate Mr.X dan ternyata memang benar galat ini memblokir menu Rancangan atau Design, sehingga anda pun tidak dapat menambah gadget.
Informasi yang muncul seperti gambar dibawah ini

galat bX-rg6px
maaf link di rahasiakan
Galat bX-rg6px  ini muncul karena blogger mendeteksi link yang berada di template dideteksi sebagai galat, walau sebenar nya itu hanya sekedar link yang dideteksi sebagai galat, tetapi bisa membuat template anda tidak bisa diakses.
Sehingga muncul informasi galat seperti gambar dibawah ini:

galat bX-rg6px

Cara mengatasi nya cukup  dengan mendelete link yang terdapat pada template anda yang diduga sebagai galat dan jangan menghapus link artikel anda. Karena yang bermasalah adalah link yang berada di dalam template dan bukan link dalam artikel anda.

Cara nya:
1. Akses Blogger anda di www.blogger.com
2. Pada Dasbor klik Rancangan atau Design
3. Klik Edit HTML
4. Cari link yang bermasalah tersebut yang diduga sebagai galat. Lalu hapus link tersebut
5. Klik Simpan Template

Bila setelah melakukan cara diatas muncul galat dari link lainnya, maka hapus kembali link yang dideteksi sebagai galat sampai template kita bebas dari galat.

Selain Galat diatas, masih terdapat galat lainnya yang bisa menyerang blog anda seperti: bX-81nuwv,  bX-5eka1d, bX-59cppw, bX-v49cve, bX-59cppw,  bX-193ra1,  bX-f3ec2g,  bX-4un7qp, bX-l6y4ub, bX-xykw2l, bX-q0tcxb, bX-4igpf1,  bX-u01hr1 dan masih banyak galat yang lainnya.

Semoga informasi cara mengatasi Galat diatas bisa berguna bagi anda semua, khususnya bagi anda yang template nya sedang bermasalah terkena galat bX-rg6px

Artikel ini di copy dari Marcellino. Silakan Copy Artikel ini dan posting pada blog anda dengan menyertakan link sumber nya.

Kamis, 08 Juli 2010

Site Manager

From FileZilla Wiki

Jump to: navigation, search

[edit] FileZilla Site Manager

The Site Manager allows FileZilla client users to store information about their FTP sites.

[edit] Starting Site Manager

The Site Manager command is located under the File sub menu. You can also press CTRL+s

[edit] Site Manager Dialog

Use the Select Entry panel on the left to select the target site. Once a site is selected, you may do the following with it :
  • Connect to,
  • Edit,
  • Copy,
  • Rename, or
  • Delete.
Use the New Folder button to introduce or add folders.
In the right panel, you have 4 tabs to enter a few needed and many optional information about the selected site on the left. They are the following:
  • GENERAL tab : Here, you may enter :
    • the hostname : Example: ftp.ifyouliked.com
    • the Port number : only if it differs from the standards
    • the type of FTP server you will connect to (such as FTP or SFTP),
    • the type of login that will take place, when appropriate. The options are:
      • Anonymous: You can't enter a username and password. In this case the username always is anonymous.
      • Normal: You have to enter a username and if required, a password.
      • Ask for password: FileZilla asks you the password during logon and it remembers the password during the session.
      • Interactive: FileZilla asks for the password ... and asks again for every new connection to the server.
      • Account: Selecting this enables the "Account" field in the bookmark's settings. This account type is for FTP only, SFTP does not have support for it.
    • the user ID to use when connecting,
    • the password required : optional
    • the account information needed : optional
    • comments about the site : optional
  • ADVANCED tab: Here you may enter :
    • Servertype : allows you to make a special selection for this FTP target. Most sites will work fine with the Default value, however some will require SFTP.
    • Bypass proxy : Allows to bypass any proxy server.
    • Default local directory field : Allows you to specify a starting local folder when activating a connection. Example: D:\sites\site1
    • Default remote directory : Allows you to specify a starting remote sub-folder when activating a connection. Begin it with a / and add only the path that follows the root ftp directory. Example: /public_html
    • Time Zone Settings : Allows to interpret time zone values for the FTP server different from its real settings. See the server timezone offset page for more information.
  • TRANSFER SETTINGS tab: Specifies in more detail how transfer may take place.
  • CHARSET tab : Specifies the character set used to communicate with the targeted FTP site.

FileZilla Client Setting

Using

From FileZilla Wiki

Jump to: navigation, search

Contents

[hide]

Quick Guide

This guide gives you a short overview on how to use FileZilla. By default you don't have to configure FileZilla, so you can start directly working with the program.


Connecting to an FTP server

Using the Quick Connect bar

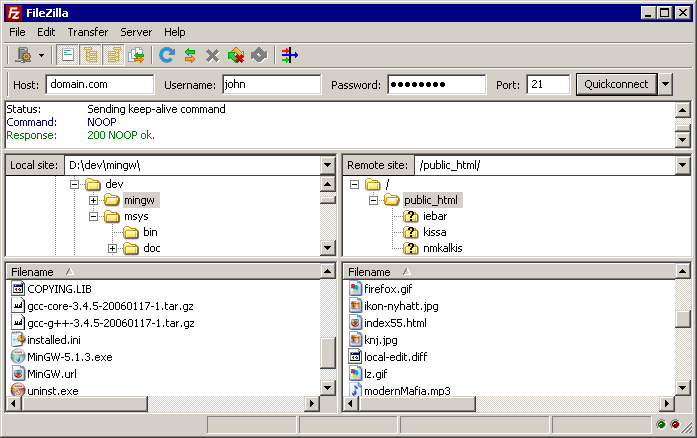
To connect to an FTP server, enter the address of the server into the host field of the Quickconnect bar (i.e. domain.com - see image below). If it is a special server type like an SFTP server, add the protocol in front of the address. In case of an SFTP server, start the address with 'sftp://' (i.e. sftp://domain.com). Enter the port of the server into the port field if it is not the default port (21 for FTP, 22 for SFTP). If a username / password is required, enter it in the corresponding fields, otherwise the default anonymous logon will be used. Click on Quickconnect or press Enter to connect to the server.
Image:Enter-info.png
Please notice that the Quick Connect is for... quick connections - so there is no way to edit the quick connections list which stores the last 10 entries. To store FTP server names you should use the Site Manager, instead.
Quick Connect is good for testing the login info before making a site manager entry. Once you connect, you can choose File -> "Copy current connection to Site Manager..." to make a permanent entry. It is usually best to check your login info with Quick Connect before making a permanent entry.

Using Site Manager

You can use the FileZilla Site Manager to specify specific site parameters and connect to the targeted FTP site. The Site Manager allows you to store entries and configure more parameters than the Quick Connect allows.

Special case: Servers in LAN

If the server you are connecting to is in your home LAN, then there is not an address (domain name) as you may know from the Internet. In LAN, you simply use the internal IP address of the server PC. In most cases the network name (computer name) will do, too. If the server is on the same PC as Filezilla, you can even use localhost or 127.0.0.1 as hostname.
NOTE: If you connect from the outside of your LAN this does not apply, you have to use the external (WAN) IP instead.

Navigating on the server

After a successful connection attempt, a list of files and folders appears on the right side of the main window. The current folder is listed in the edit field on the top. Below you will see the remote directory tree and below that, the contents of the current remote folder. There are three ways to change the folder. First, you can double-click a folder in the file list. Second, you can change the current folder by clicking a folder in the directory tree. Last but not least, you can always enter the folder name into the edit field and press enter. You will notice a folder called ".." displayed in virtually all directories. This folder allows you to go up to the parent directory of the current folder.
Image:Navigating-remote.png

Navigating on your machine

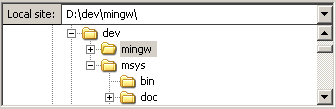
Navigating on your machine works almost like navigating on the server. The current local folder and the local directory tree are displayed on the left side of the main window by default.
Image:Navigating-local.png

Synchronized Browsing

If you have an identical directory structure on the local machine and the server, you can enable synchronized browsing. This means that any directory navigation on one machine is duplicated on the other.
To enable synchronized browsing, create an entry in the Site Manager, and on the Advanced tab, ensure that the Default local directory and the Default remote directory have the same structure. Then check "use synchronized browsing," save your settings, and connect.

Directory Comparison

To quickly see differences between files on the local machine and the server, choose View > Directory Comparison, and choose either "compare file size" or "compare modification time." (You also hide identical files by checking that option.) Then choose "Enable."
You will now see color-coded differences between copies of the same file on the different machines. See their meanings here.

Transferring files

You can upload or download a file by double-clicking on it. It will be added to the transfer queue and the transfer starts automatically. To transfer folders and/or multiple files, select them and right-click the selection. Then you can click on Upload/Download in the popup menu.
Image:Transfer-rightclick.png

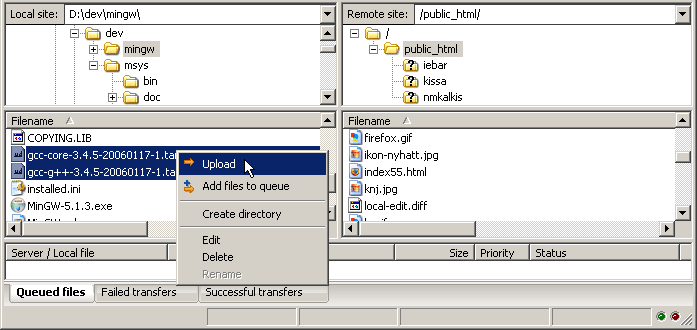
You can also drag the files from one side and drop them on the other side. To add files to the queue so that they will be transferred later, select them and click Add to Queue from the popup menu. You may also drag the files directly into the queue. Click on the Image:Process-queue-button.png button on the toolbar to start the transfer.
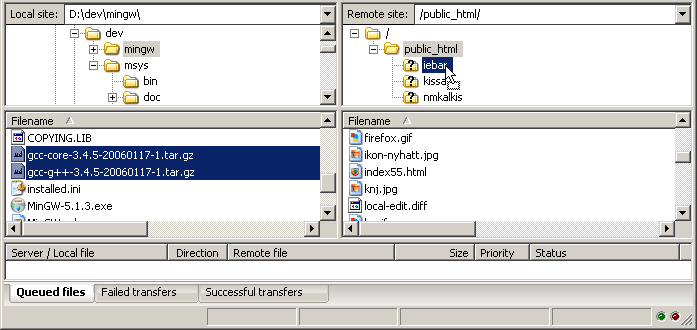
Or, you can click on a file, then drag the file (a box is added to the arrow cursor) to the folder where you want to move it. The folder will be highlighted when you are over it. Let go of the mouse button and the file will be moved to the folder.
Image:Transfer-drag.png

Detailed Information Pages

Detailed information on other aspects of the FileZilla client can be found on the following pages:

File Transfer Notes

FileZilla uses multiple FTP sessions. One session gets used purely to browse the server. The other sessions get used to do the file transfers. That way, you can always browse the server even during transfers.
For example, here is a simple car analogy: You order a pizza using your telephone (aka the browsing connection), then you hang up the telephone. Then the delivery man drives the pizza in his car to your location (the transfer connection). While the pizza is transferring, you can phone somebody else, like for example your garage because your own car is broken ;)

Reducing simultaneous connections for incorrectly configured servers

If you get a 421 Too many connections from this IP () error, the FTP server is restricting your number of connections. There are even servers restricting it to one connection at a time.
The preferred solution would be to contact the server administrator and encourage him/her to configure the server correctly (FTP uses more than one connection by design!). But if you need access immediately, there is a workaround:
1. Open the Site Manager (File - Site Manager... or the first toolbar button)
2. Create an entry for that server, enter all details you know, the more precise, the better
3. Open the 'Transfer Settings' tab
4. Tick the 'Limit number of simultaneous connections' checkbox
5. Enter the desired limit into the 'Maximum number of connections' field

Now, if you connect using the Site Manager entry, connections will be limited.
Note: If you limit connections to 1 only, there is a major drawback: You cannot browse the server anymore while a transfer is in progress!

Troubleshooting

Re-registering the shell extension (Windows only)

Especially on Vista or Windows 7 it can happen that Drag&Drop fails and you get an error message stating the shell extension doesn't work. In this case you may need to re-register it. Here's how:

1. Open a command prompt as administrator. This is important!
Start Menu - All Programs - Accessories: Right Click 'Command Prompt', select 'Run as administrator'

2. Navigate to the Filezilla program directory.
Example (32bit): cd "\Program Files\Filezilla FTP Client"
Example (64bit): cd "\Program Files (x86)\FileZilla FTP Client"
3. Re-register the shell extension.
Type 'regsvr32 fzshellext.dll' (without quotes of course)

4. If you have 64bit OS, you need to perform an additional step.
Type 'regsvr32 fzshellext_64.dll' (no quotes as well)

If you get the reply 'DllRegisterServer in ... succeeded.', you've done it (though you probably still need to reboot your computer).